
-
Hole #1
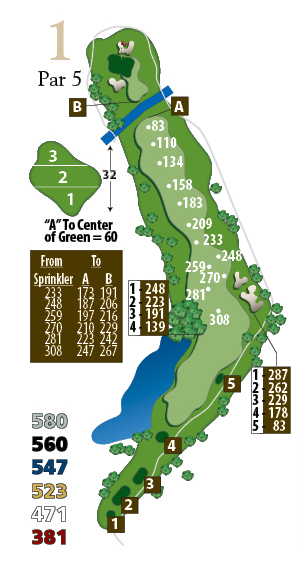
Your tee shot is key in how difficult this opening hole will be. The ideal landing area off the tee is short of the fairway bunkers but past the two large trees guarding the left side. Lay up your second shot short of South Boulder Creek leaving a wedge or short iron to a green protected by bunkers short and long.
-
Hole #2
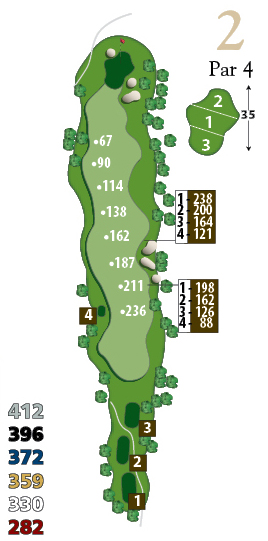
The second hole is a challenging par 4. Fairway bunkers on the right side will grab any tee shots leaking right. The hole plays uphill requiring an extra club on your approach into the green. Bunkers guarding the front right of the green will grab any approach shots coming up short.
-
Hole #3
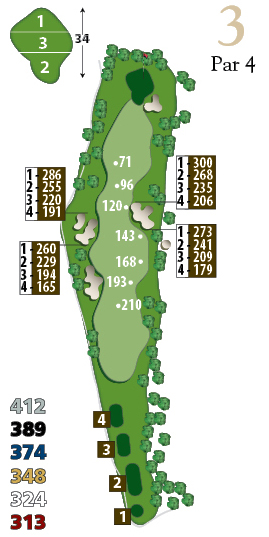
This can be a birdie opportunity if you can fit your tee shot between the fairway bunkers on this downhill par 4. A short iron or wedge should be all you have left to this rolling green with one large bunker guarding the front right side.
-
Hole #4
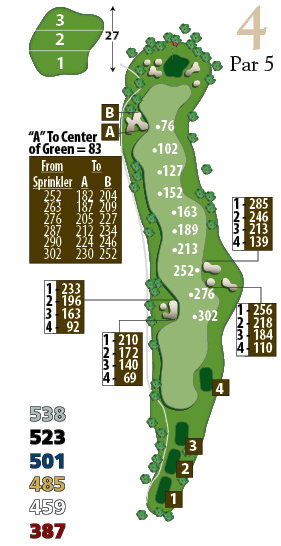
Don't lose focus as you get to one of the finest views on the course. This par 5 is very reachable for the longer hitter, but you'll need to avoid the fairway bunkers that guard both sides of the fairway. The fairway bunkers on the right side are slightly hidden from the tee. Your approach into this wide green is guarded by bunkers left and right. Any shots over the green will leave a difficult downhill chip shot.
-
Hole #5
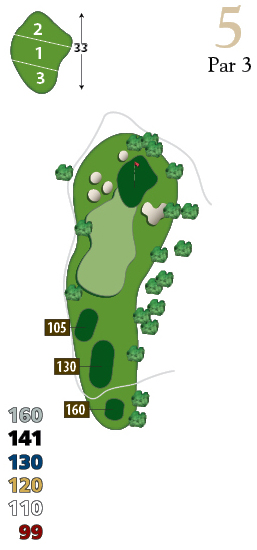
Slightly downhill par 3 looks simple enough from the tee, but you will want to stay below the hole as this green slopes from back to front. Avoid the bunkers lurking left and right if you want to make par.
-
Hole #6
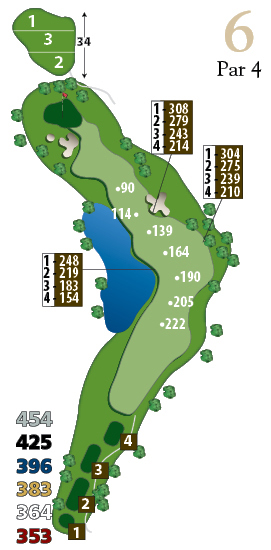
This is a very challenging dogleg left with water down the left side. The ideal landing area is just right of the water. Those that bail out right will be faced with a very long approach shot into this large green guarded by bunkers front left.
-
Hole #7
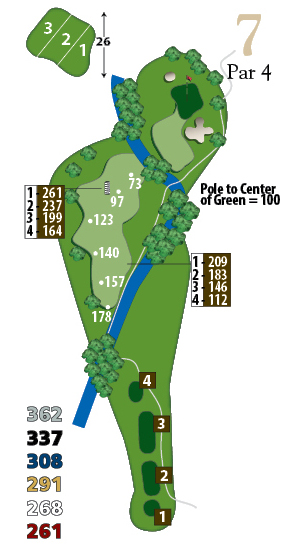
This short dogleg right par 4 can prove to be a tough test. Your tee shot is played to the barber pole that marks the ideal landing area. Tee shots that fall short of the landing area may leave a difficult second shot over or around a large tree that protects the right side of this hole. Your approach shot with a short iron is to an elevated green guarded by a large bunker on the right.
-
Hole #8
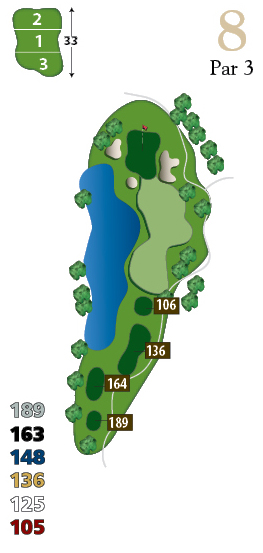
A challenging par 3 with water short and left, and bunkers left and right. Make par here and go happily to the next tee.
-
Hole #9
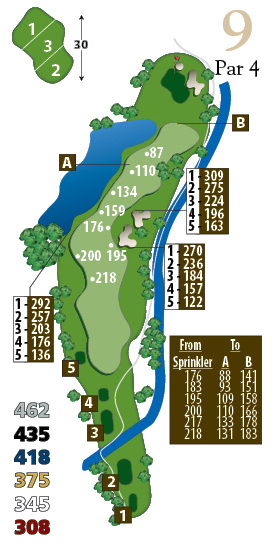
This is a tough dogleg right with fairway bunkers guarding the right side and water on the left from the landing area to the green. A good tee shot will leave a middle or long iron to a green that is slightly elevated and guarded by bunkers right and long. One of the largest greens on the course will require a good shot to find the putting surface.
-
Hole #10
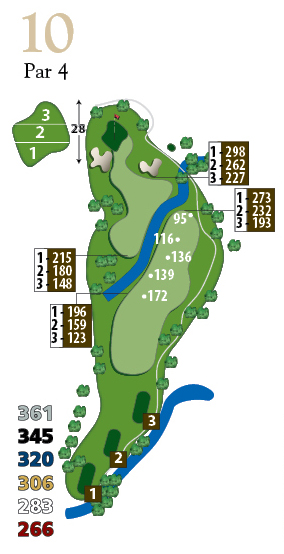
The tee shot here offers two choices with an exciting risk/reward opportunity. Longer hitters can risk hitting their tee shot over Bullhead Gulch leaving a short wedge into the green, but brings water, bunkers, and long rough into play, not to mention OB left. The safer choice is down the right side leaving a short iron into the green. Stay below the hole as this green slopes from back to front.
-
Hole #11
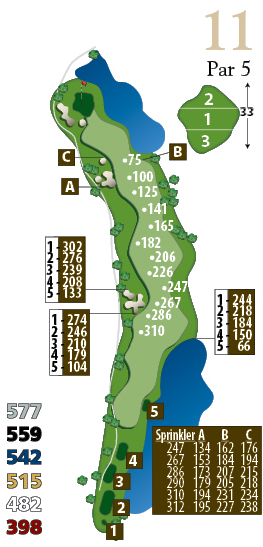
Long par 5 offers a generous fairway off the tee with water down the right side and fairway bunkers guarding the left side at the corner of the dogleg. On your second shot either layup to a yardage that is short of the water, or risk getting closer to the green and bringing the bunkers and water into play. Approach shots into the green are faced with water right and bunkers left.
-
Hole #12
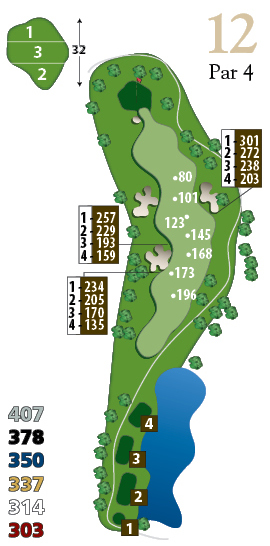
Aim your tee shot at the bunker at the end of the fairway to be in good position to attack the pin. Tee shots drifting left will usually find the fairway bunker guarding the dogleg and will make getting a par difficult. One small bunker guards the front of this green and tends to catch approach shots coming up short.
-
Hole #13
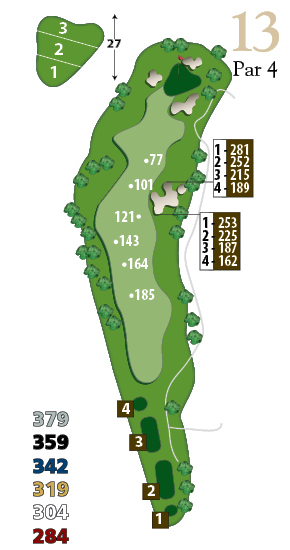
Short par 4 that doglegs to the right is guarded by a fairway bunker that should be avoided if you want to make par. Play your tee shot left or short of the fairway bunker leaving a short iron into the green that is guarded by bunkers right, left, and long.
-
Hole #14

A short par 3 with a large green. The only hole on the course without a bunker. Keep your approach shot below the hole as this green slopes from back to front.
-
Hole #15
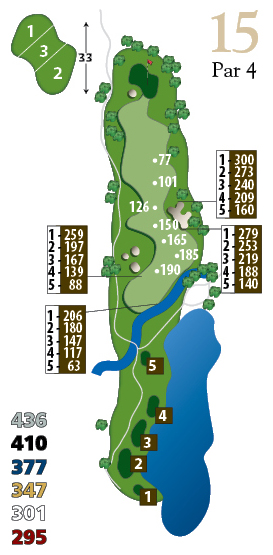
One of the best holes on the course. A long and accurate tee shot over Bullhead Gulch is required to find the fairway. A large mound and bunkers guard the left side off the tee while bunkers on the right will catch tee shots leaking that direction. An uphill approach to a large green is guarded by a deep bunker on the left.
-
Hole #16
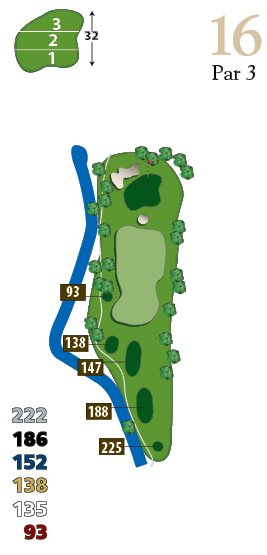
This is a challenging par 3 that plays 222 yards from the back tees and is guarded by a small bunker in front and a large bunker behind the green. You will need to hit a tee shot that lands soft and stops quickly to hold this green and avoid the trouble long. Par here is always a good score.
-
Hole #17
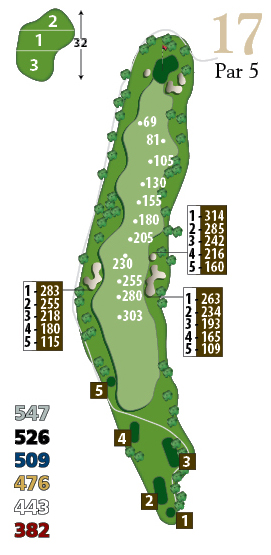
Grip it & Rip it on this uphill par 5. The tee shot offers a very wide fairway off the tee so no excuses for missing it. The fairway bunker on the right will swallow up shots heading that way making this hole more difficult than it should be. Layup to your favorite yardage on the second shot to make for an easier approach into the green which plays dramatically uphill. Deep bunkers on the right will catch any shots coming up short.
-
Hole #18
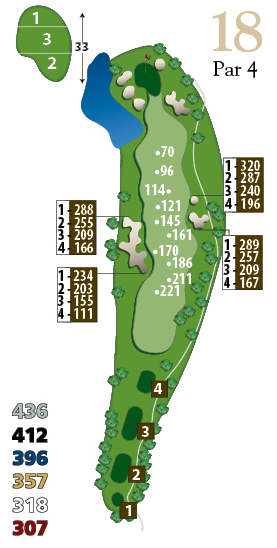
Enjoy the view as you get to this picturesque downhill par 4. Danger is lurking down the left with a large fairway bunker that is difficult to play from, as well as a pond that can catch errant tee shots from big hitters. Your approach is slightly downhill into a large green surrounded by bunkers ready to catch any mis-guided approach shots.